Running WebSocket for Redis
WebSocket for Redis is a library which runs side by side with Django. It has its own separate main loop, which does nothing else than keeping the WebSocket alive and dispatching requests from Redis to the configured WebSockets and vice versa.
Django with WebSockets for Redis in development mode
With WebSockets for Redis, a Django application has immediate access to code written for WebSockets. Make sure, that Redis is up and accepts connections.
$ redis-cli ping
PONG
Then start the Django development server.
./manage.py runserver
As usual, this command shall only be used for development.
The runserver command is a monkey patched version of the original Django main loop and works
similar to it. If an incoming request is of type WSGI, everything works as usual. However, if the
patched handler detects an incoming request wishing to open a WebSocket, then the Django main
loop is hijacked by ws4redis. This separate loop then waits until select notifies that some
data is available for further processing, or by the WebSocket itself, or by the Redis message queue.
This hijacked main loop finishes when the WebSocket is closed or when an error occurs.
Note
In development, one thread is created for each open WebSocket.
Opened WebSocket connections exchange so called Ping/Pong messages. They keep the connections open, even if there is no payload to be sent. In development mode, the “WebSocket” main loop does not send these stay alive packages, because normally there is no proxy or firewall between the server and the client which could drop the connection. This could be easily implemented, though.
Django with WebSockets for Redis as a stand alone uWSGI server
In this configuration the uWSGI server owns the main loop. To distinguish WebSockets from
normals requests, modify the Python starter module wsgi.py to
import os
os.environ.setdefault('DJANGO_SETTINGS_MODULE', 'myapp.settings')
from django.conf import settings
from django.core.wsgi import get_wsgi_application
from ws4redis.uwsgi_runserver import uWSGIWebsocketServer

_django_app = get_wsgi_application()
_websocket_app = uWSGIWebsocketServer()

def application(environ, start_response):
    if environ.get('PATH_INFO').startswith(settings.WEBSOCKET_URL):
        return _websocket_app(environ, start_response)
    return _django_app(environ, start_response)
Run uWSGI as stand alone server with
uwsgi --virtualenv /path/to/virtualenv --http :80 --gevent 100 --http-websockets --module wsgi
This will answer, both Django and WebSocket requests on port 80 using HTTP. Here the modified
application dispatches incoming requests depending on the URL on either a Django handler or
into the WebSocket’s main loop.
This configuration works for testing uWSGI and low traffic sites. Since uWSGI then runs in one
thread/process, blocking calls such as accessing the database, would also block all other HTTP
requests. Adding --gevent-monkey-patch to the command line may help here, but Postgres for
instance requires to monkey patch its blocking calls with gevent using the psycogreen library.
Moreover, only one CPU core is then used, and static files must be handled by another webserver.
Serving static files
In this configuration, you are not able to serve static files, because Django does not run in debug
mode and uWSGI does not know how to server your deployed static files. Therefore in urls.py add
staticfiles_urlpatterns to your urlpatterns:
from django.conf.urls import url, patterns, include
from django.contrib.staticfiles.urls import staticfiles_urlpatterns

urlpatterns = patterns('',
    ....
) + staticfiles_urlpatterns()
Note
Remember to remove staticfiles_urlpatterns when upgrading to a more scalable
configuration as explained in the next section.
Django with WebSockets for Redis behind NGiNX using uWSGI
This is the most scalable solution. Here two instances of a uWSGI server are spawned, one to handle normal HTTP requests for Django and one to handle WebSocket requests.
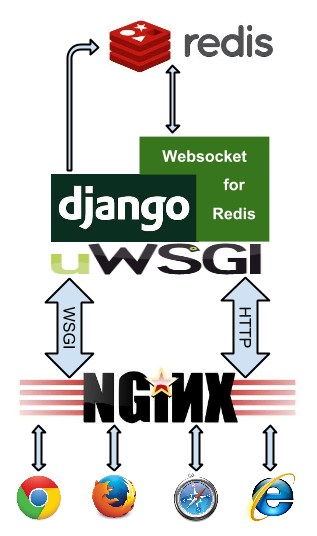
Assure that you use NGiNX version 1.3.13 or later, since earlier versions have no support for WebSocket proxying. The web server undertakes the task of dispatching normal requests to one uWSGI instance and WebSocket requests to another one. The responsible configuration section for NGiNX shall look like:
location / {
    include /etc/nginx/uwsgi_params;
    uwsgi_pass unix:/path/to/django.socket;
}

location /ws/ {
    proxy_http_version 1.1;
    proxy_set_header Upgrade $http_upgrade;
    proxy_set_header Connection "upgrade";
    proxy_pass http://unix:/path/to/web.socket;
}
For details refer to NGiNX’s configuration on WebSocket proxying.
Since both uWSGI handlers create their own main loop, they also require their own application and
different UNIX sockets. Create two adopter files, one for the Django loop, say wsgi_django.py
import os
os.environ.update(DJANGO_SETTINGS_MODULE='my_app.settings')
from django.core.wsgi import get_wsgi_application
application = get_wsgi_application()
and one for the WebSocket loop, say wsgi_websocket.py
import os
import gevent.socket
import redis.connection
redis.connection.socket = gevent.socket
os.environ.update(DJANGO_SETTINGS_MODULE='my_app.settings')
from ws4redis.uwsgi_runserver import uWSGIWebsocketServer
application = uWSGIWebsocketServer()
Start those two applications as separate uWSGI instances
uwsgi --virtualenv /path/to/virtualenv --socket /path/to/django.socket --buffer-size=32768 --workers=5 --master --module wsgi_django
uwsgi --virtualenv /path/to/virtualenv --http-socket /path/to/web.socket --gevent 1000 --http-websockets --workers=2 --master --module wsgi_websocket
The NGiNX web server is now configured as a scalable application server which can handle a thousand WebSockets connections concurrently.
If you feel uncomfortable with separating WebSocket from normal requests on NGiNX, consider that you already separate static and media requests on the web server. Hence, WebSockets are just another extra routing path.
Django with WebSockets for Redis behind Apache-2.4 using uWSGI
Mike Martinka <mike.martinka@ntrepidcorp.com> reported this configuration, which allows to run ws4redis with Apache-2.4 and later.
Configuration for uWSGI:
[uwsgi]
env=DJANGO_SETTINGS_MODULE=<app>.settings
module=<module>:application
master=True
http-socket=127.0.0.1:9090
http-websockets=true
gevent=1000
workers=2
plugin=python
Configuration section for Apache:
<VirtualHost IPADDR:80>
    ProxyPass    /ws/    ws://127.0.0.1:9090/
</VirtualHost>
Django with WebSockets for Redis as a stand alone uWSGI server in emperor mode
In this configuration the uWSGI server owns both main loops. To distinguish WebSockets from normal requests, use uWSGI’s internal routing capabilities.
Note
The internal routing capabilities of uWSGI is dependent on the Perl Compatible Regular Expressions (PCRE) library. Make sure that your uWSGI was built with PCRE support if you plan to run in emperor mode. Please refer to the PCRE Support section below for more information.
First create the two applications, wsgi_django.py and wsgi_websocket.py using the same code
as in the above example. These are the two entry points for uWSGI. Then create these three
ini-files, one for the emperor, say uwsgi.ini:
[uwsgi]
emperor = vassals
http-socket = :9090
die-on-term = true
offload-threads = 1
route = ^/ws uwsgi:/var/tmp/web.socket,0,0
route = ^/ uwsgi:/var/tmp/django.socket,0,0
Create a separate directory named vassals and add a configuration file for the Websocket
loop, say vassals/wsserver.ini:
; run the Websocket loop
[uwsgi]
umask = 002
virtualenv = /path/to/your/virtualenv
chdir = ..
master = true
no-orphans = true
die-on-term = true
memory-report = true
env = DJANGO_SETTINGS_MODULE=my_app.settings
socket = /var/tmp/web.socket
module = wsgi_websocket:application
threads = 1
processes = 1
http-websockets = true
gevent = 1000
To the directory named vassals, add a configuration file for the Django loop, say
vassals/runserver.ini:
; run the Django loop
[uwsgi]
umask = 002
virtualenv = /path/to/your/virtualenv
chdir = ..
master = true
no-orphans = true
die-on-term = true
memory-report = true
env = DJANGO_SETTINGS_MODULE=my_app.settings
socket = /var/tmp/django.socket
module = wsgi_django:application
buffer-size = 32768
threads = 1
processes = 2
Adopt the virtualenv, pathes, ports and number of threads/processes to your operating system and hosts capabilities.
Then start uWSGI:
uwsgi --ini uwsgi.ini
This configuration scales as well, as the sample from the previous section. It shall be used if no NGiNX server is available.
Serving static files
The alert reader will have noticed, that static files are not handled by this configuration. While
in theory it is possible to configure uWSGI to deliver static files, please note that
uWSGI is not intended to completly replace a webserver. Therefore, before adding
route = ^/static static:/path/to/static/root to the emperors ini-file, consider to place them
onto a Content Delivery Network, such as Amazon S3.
PCRE Support
If you encounter the error message !!! no internal routing support, rebuild with pcre support !!!
in the logs/console when running in emperor mode, that means you were lacking the PCRE libraries
when you first installed uWSGI. You will need to rebuild the uWSGI binaries. To do that uninstall uWSGI, and
then download the libpcre3 and libpcre3-dev libraries using your system’s package management tool.
Once finished, reinstall uWSGI. Credits to this post.